Monday, September 04, 2006
Questor Construction Begins
Welcome to Project Questor.
That is the working title I have given to my new airplane project. Some new information obtained yesterday may steer my project in slightly new directions (as far as design).
I had a good day of flying, yesterday, by the way. I got out late and went to Rancho San Antonio park and found some guys flying electric helicopters. I discovered the park does not allow gas powered planes (WHAT?!?!), so I could not fly there, but the guys there told me about Bayside RC club in Fremont, so I went out there.
There is simply no convenient place to fly on the peninsula! It sucks.
Anyway, I got to the club and realized I had flown there once before. Once. The pilot stations face West, which makes the place useless for flying in the late afternoon (who wants to go blind?). And it had a very restricted flying range and an extremely narrow runway. Neither of which was a problem for my flying skill, just an annoyance.
The real annoyance were the hot shit hot shot hot dog testosterone driven pilots out there flying helicopters like they were angry insects, and airplanes like they were helicopters. I was tempted to go ask the helicopter pilot what was wrong with his helicopter and why it wouldn't fly straight (being totally sarchastic, of course), but then he crashed it and I felt the need pass.
My little blue Stick 30 with the diesel 4-stroke O.S. .26 (converted) engine could hardly be heard - man I love the quiet! - and towed my little plane around the sky with ease. I did touch-and-goes in a cross wind and was having a good time. I brought three planes out with me, but only flew the one. The one that turned 24 years old this weekend did not fly, but I am determined to fly it again, soon.
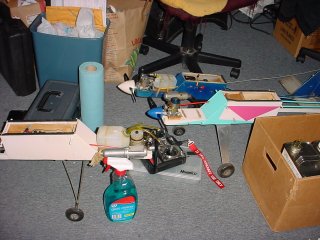
Those are the three planes (partial shot, anyway) just before I packed them into the car. My next door neighbor happened to come home and see the planes in the car. It turns out he used to fly a lot - mostly off the water. He used to fly a Stick 30 - just like the blue one in the picture that I flew yesterday - with pontoons! I am going to take advantage of his knowledge and have him help me make pontoons for my new plane.
He also mentioned that he crashed his plane and put the wing from another airplane on it and it flew like a dream. I am going to see if I can track down the airfoil and the dimensions for that wing and work it into my new design.
I am still designing - and will probably continue to revise my designs as I build - but construction began today. I am starting with the tail section. At first, I thought the fin was what I needed to build, first, so I could build the supporting pieces to fit nicely. But then I realized I needed to figure out the electrical connections to support night flying (lights in the tail), and that necessitated building the tail boom, first. So that's what I did.
This first image, below, shows a closeup of one of the boom sticks being built. I have installed a connector with a single wire that extends all the way down the stick to where the stabilizer will mount. This wire sits between two sticks that are laminated together to become one of the boom sticks.
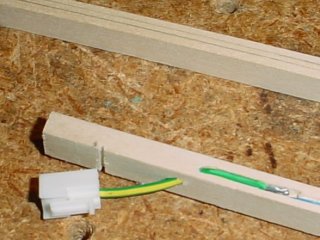
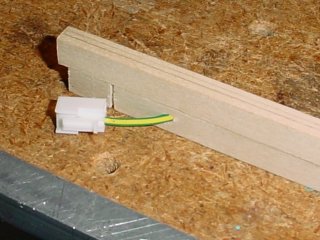
The shot below shows the two sticks laminated together to become the right-hand side tail boom stick, with the electrical connector extending from within. Sealing the wire between the sticks in this manner will completely eliminate any possibility of wire chafing or vibrational breakage over time.
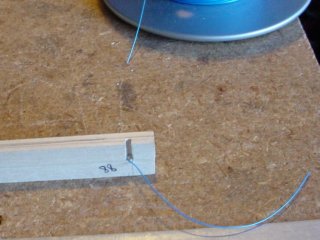
The positive lead runs down one boom stick, and the negative lead runs down the other stick. Here is a shot of the wire exiting the other end of one of the sticks. Eventually, there will be a connector permanently installed where you see the notch, and the stabilizer will plug into it when it is mounted on the tail boom.
And here, below, you can kind of see the two completed boom sticks laying together on the bench. Next weekend, I will be doing some serious work on the tail section. I will have to make a jig to get the proper bow in the boom sticks, but that should be pretty easy. Then I can glue the gusset on the tail end and begin building up all the pieces.

There are 17 (potentially 19) additional pieces I need to make for the tail, not including wire for the LEDs in the stabilizer, the LEDs, hinges, tail skid and five nylon bolts. Because of the removable nature of the tail, it is the most complex piece of this airframe. Once it is done, the rest will go rather quickly...except the wing, which, of course, will take considerable time.
Then comes the tedious job of sanding, filling, sanding, filling, sanding, painting and covering the thing. Then I'll get to install the landing gear and flight controls, radio and engine, do all the pre-flight testing, then take it out for a test flight. Then I'll be in business!
I should have it ready to fly by next summer...and I plan to do a lot of flying next summer!
That is the working title I have given to my new airplane project. Some new information obtained yesterday may steer my project in slightly new directions (as far as design).
I had a good day of flying, yesterday, by the way. I got out late and went to Rancho San Antonio park and found some guys flying electric helicopters. I discovered the park does not allow gas powered planes (WHAT?!?!), so I could not fly there, but the guys there told me about Bayside RC club in Fremont, so I went out there.
There is simply no convenient place to fly on the peninsula! It sucks.
Anyway, I got to the club and realized I had flown there once before. Once. The pilot stations face West, which makes the place useless for flying in the late afternoon (who wants to go blind?). And it had a very restricted flying range and an extremely narrow runway. Neither of which was a problem for my flying skill, just an annoyance.
The real annoyance were the hot shit hot shot hot dog testosterone driven pilots out there flying helicopters like they were angry insects, and airplanes like they were helicopters. I was tempted to go ask the helicopter pilot what was wrong with his helicopter and why it wouldn't fly straight (being totally sarchastic, of course), but then he crashed it and I felt the need pass.
My little blue Stick 30 with the diesel 4-stroke O.S. .26 (converted) engine could hardly be heard - man I love the quiet! - and towed my little plane around the sky with ease. I did touch-and-goes in a cross wind and was having a good time. I brought three planes out with me, but only flew the one. The one that turned 24 years old this weekend did not fly, but I am determined to fly it again, soon.
Those are the three planes (partial shot, anyway) just before I packed them into the car. My next door neighbor happened to come home and see the planes in the car. It turns out he used to fly a lot - mostly off the water. He used to fly a Stick 30 - just like the blue one in the picture that I flew yesterday - with pontoons! I am going to take advantage of his knowledge and have him help me make pontoons for my new plane.
He also mentioned that he crashed his plane and put the wing from another airplane on it and it flew like a dream. I am going to see if I can track down the airfoil and the dimensions for that wing and work it into my new design.
I am still designing - and will probably continue to revise my designs as I build - but construction began today. I am starting with the tail section. At first, I thought the fin was what I needed to build, first, so I could build the supporting pieces to fit nicely. But then I realized I needed to figure out the electrical connections to support night flying (lights in the tail), and that necessitated building the tail boom, first. So that's what I did.
This first image, below, shows a closeup of one of the boom sticks being built. I have installed a connector with a single wire that extends all the way down the stick to where the stabilizer will mount. This wire sits between two sticks that are laminated together to become one of the boom sticks.
The shot below shows the two sticks laminated together to become the right-hand side tail boom stick, with the electrical connector extending from within. Sealing the wire between the sticks in this manner will completely eliminate any possibility of wire chafing or vibrational breakage over time.
The positive lead runs down one boom stick, and the negative lead runs down the other stick. Here is a shot of the wire exiting the other end of one of the sticks. Eventually, there will be a connector permanently installed where you see the notch, and the stabilizer will plug into it when it is mounted on the tail boom.
And here, below, you can kind of see the two completed boom sticks laying together on the bench. Next weekend, I will be doing some serious work on the tail section. I will have to make a jig to get the proper bow in the boom sticks, but that should be pretty easy. Then I can glue the gusset on the tail end and begin building up all the pieces.
There are 17 (potentially 19) additional pieces I need to make for the tail, not including wire for the LEDs in the stabilizer, the LEDs, hinges, tail skid and five nylon bolts. Because of the removable nature of the tail, it is the most complex piece of this airframe. Once it is done, the rest will go rather quickly...except the wing, which, of course, will take considerable time.
Then comes the tedious job of sanding, filling, sanding, filling, sanding, painting and covering the thing. Then I'll get to install the landing gear and flight controls, radio and engine, do all the pre-flight testing, then take it out for a test flight. Then I'll be in business!
I should have it ready to fly by next summer...and I plan to do a lot of flying next summer!
posted by Bill @ 10:37 PM
![]()


3 Comments:
At 5/9/06 8:08 AM, Jude said…
Wheee! Sounds like your plan is coming together Bill. Night flying?? Who'da thunk? Cool!
At 5/9/06 6:27 PM, Bill said…
Yep! You can read all about my night flying on my aging old web site, http://www.rcnightflying.com -- and you can see the re-design of the web site that I never got around to completing, at http://www.rcnightflying.com/new
At 6/9/06 5:03 AM, Tracey said…
I never realized just how much work goes into something like this Bill. Wow! I'm getting edu-ma-cated while reading! ;)
Night flying sounds like it'd be a real challenge, but i'm sure you're more than up to it. :)
Looks like a great start and i'm looking forward to reading how the project progresses.
Post a Comment
<< Home