Monday, September 18, 2006
Questor, Questor, Questor!
My blog entry titles are getting rather boring - they're all about Questor these days. I really need to move this to a project page. But then I don't seem to have anything else to blog about.
I made some more progress yesterday, though it was painfully slow. It seems the more progress I make, the further I am from completion, but that's only because the deeper I get into it, the more issues and details I uncover.
I have identified 31 additional steps remaining just to complete the process of laminating the top half of the horizontal stabilizer to the bottom half. However, here's what I got done yesterday...
I got to thinking about how I haven't yet decided how to physically connect the power from the tail boom to the horizontal stabilizer, and I thought I better give myself a couple of options. I already had access to the power traces under the mounting plate, but that would be difficult to get to unless I made something that was recessed into the tail where the stabilizer mounts. So, I decided to add a couple more power traces off to the side where they would be unobstructed in case I wanted to connect them through an easier access point.

You can see the new traces (copper foil) on the left. You can also see a couple new clearance holes that I cut for the heads of the mounting bolts to sit down into. You'll see how that works later (though you got a hint of it a couple days ago).

Here you can see the completed upper half of the horizontal stabilizer. Bear in mind that this thing is only 3/32" thick! It now has six functional LEDs installed (three of them were not working yesterday - I had somehow cut one of the wires near a solder connection, probably while I was grinding off high spots, but I fixed that problem). With all the LEDs, wire, solder, copper, mounting bolts, etc. that will be part of this tail, I am hoping weight is not going to become an issue. I am thinking of cutting a hole or two in the fin (vertical stabilizer) to reduce some weight, as well as drill some holes in non-critical areas in the tail boom. Although, there are very few options for where I can do that, so it may not be significant. I may just wind up shortening the tail boom a little bit to decrease the moment arm, though that will make the plane a bit more responsive to the elevator, and I'm not sure I want that.
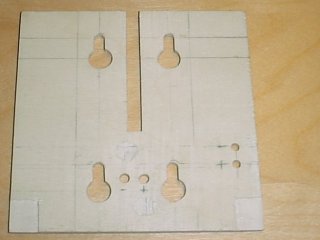
Here's a close-up of the mounting plate that will become part of the lower half of the horizontal stabilizer that gets laminated to the upper half. This is made of light plywood and is 1/8" thick (1/32" thicker than the upper half). It needed to be thicker than 3/32" to provide enough strength for securing the horizontal stabilizer to the tail boom. You can see the four keyhole mounting holes of the kind I featured in an earlier blog entry. This is where the mounting bolts will do their job.
You're looking at the side that gets laminated to the upper half. You can see a couple of square-ish clearance cut-outs in the bottom corners. This is to give room for the elevator hinge. I decided to cut them prior to laminating the layers together so I would have an easier time of installing the hinges afterward, and could also ensure a precision fit. You can also see two additional holes that I drilled off to the side to provide access to the new copper traces.
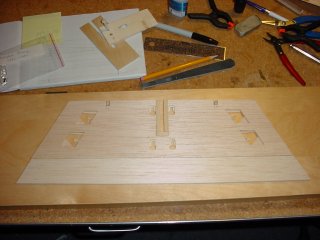
Here is a shot of all the pieces (thus far) of the horizontal stabilizer temporarily assembled, including the elevator. The remaining two pieces of the lower layer are made of balsa wood and are 3/32" thick, which makes the whole stabilizer 3/16" thick after assembly (except for the center, which becomes 7/32" thick due to the 1/8" plywood). One of the steps I have to take before laminating the pieces together is to sand the sides of the center plate down at a gradual angle until the sides become 3/32" and sit flush where they butt up against the 3/32" balsa sides. I know that is as difficult to visualize as it is to describe. It's hard enough to see the assembly in this picture, especially while it is resting on a big piece of wood that is about the same color.
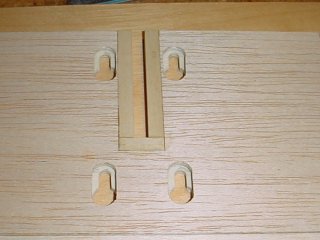
And here's the mounting holes as seen from the top side of the horizontal stabilizer. When completed, the stabilizer will be covered with MonoKote, which is a heat shrink plastic covering that adheres to the surface. The mounting bolts will actually be permanently attached to a mating mounting plate on the tail boom, and the stabilizer will [theoretically] slip down over the four bolts and slide back to lock into place. The holes you see here will be covered by the MonoKote, so the heads of the bolts will not even be visible. It will be a nice, clean installation with no interruption of airflow over the stabilizer!
My motto is, I've got a long way to go. But I can see this plane in my mind, and I see it flying, so I know it will happen. I know when I can see the end objective so clearly in my mind, that it is something that will be realized, and I hope to fly this thing at least a dozen times before this time next year.
HA! Well, THAT remains to be seen.
I made some more progress yesterday, though it was painfully slow. It seems the more progress I make, the further I am from completion, but that's only because the deeper I get into it, the more issues and details I uncover.
I have identified 31 additional steps remaining just to complete the process of laminating the top half of the horizontal stabilizer to the bottom half. However, here's what I got done yesterday...
I got to thinking about how I haven't yet decided how to physically connect the power from the tail boom to the horizontal stabilizer, and I thought I better give myself a couple of options. I already had access to the power traces under the mounting plate, but that would be difficult to get to unless I made something that was recessed into the tail where the stabilizer mounts. So, I decided to add a couple more power traces off to the side where they would be unobstructed in case I wanted to connect them through an easier access point.
You can see the new traces (copper foil) on the left. You can also see a couple new clearance holes that I cut for the heads of the mounting bolts to sit down into. You'll see how that works later (though you got a hint of it a couple days ago).
Here you can see the completed upper half of the horizontal stabilizer. Bear in mind that this thing is only 3/32" thick! It now has six functional LEDs installed (three of them were not working yesterday - I had somehow cut one of the wires near a solder connection, probably while I was grinding off high spots, but I fixed that problem). With all the LEDs, wire, solder, copper, mounting bolts, etc. that will be part of this tail, I am hoping weight is not going to become an issue. I am thinking of cutting a hole or two in the fin (vertical stabilizer) to reduce some weight, as well as drill some holes in non-critical areas in the tail boom. Although, there are very few options for where I can do that, so it may not be significant. I may just wind up shortening the tail boom a little bit to decrease the moment arm, though that will make the plane a bit more responsive to the elevator, and I'm not sure I want that.
Here's a close-up of the mounting plate that will become part of the lower half of the horizontal stabilizer that gets laminated to the upper half. This is made of light plywood and is 1/8" thick (1/32" thicker than the upper half). It needed to be thicker than 3/32" to provide enough strength for securing the horizontal stabilizer to the tail boom. You can see the four keyhole mounting holes of the kind I featured in an earlier blog entry. This is where the mounting bolts will do their job.
You're looking at the side that gets laminated to the upper half. You can see a couple of square-ish clearance cut-outs in the bottom corners. This is to give room for the elevator hinge. I decided to cut them prior to laminating the layers together so I would have an easier time of installing the hinges afterward, and could also ensure a precision fit. You can also see two additional holes that I drilled off to the side to provide access to the new copper traces.
Here is a shot of all the pieces (thus far) of the horizontal stabilizer temporarily assembled, including the elevator. The remaining two pieces of the lower layer are made of balsa wood and are 3/32" thick, which makes the whole stabilizer 3/16" thick after assembly (except for the center, which becomes 7/32" thick due to the 1/8" plywood). One of the steps I have to take before laminating the pieces together is to sand the sides of the center plate down at a gradual angle until the sides become 3/32" and sit flush where they butt up against the 3/32" balsa sides. I know that is as difficult to visualize as it is to describe. It's hard enough to see the assembly in this picture, especially while it is resting on a big piece of wood that is about the same color.
And here's the mounting holes as seen from the top side of the horizontal stabilizer. When completed, the stabilizer will be covered with MonoKote, which is a heat shrink plastic covering that adheres to the surface. The mounting bolts will actually be permanently attached to a mating mounting plate on the tail boom, and the stabilizer will [theoretically] slip down over the four bolts and slide back to lock into place. The holes you see here will be covered by the MonoKote, so the heads of the bolts will not even be visible. It will be a nice, clean installation with no interruption of airflow over the stabilizer!
My motto is, I've got a long way to go. But I can see this plane in my mind, and I see it flying, so I know it will happen. I know when I can see the end objective so clearly in my mind, that it is something that will be realized, and I hope to fly this thing at least a dozen times before this time next year.
HA! Well, THAT remains to be seen.
posted by Bill @ 9:06 PM
![]()


3 Comments:
At 20/9/06 7:54 AM, Tracey said…
I'm learning tons reading all this Bill! Love it! And i'm sure you'll get it done, like you want, when you want :)
At 21/9/06 8:55 AM, Jude said…
I don't want to sound like such a "Girl!" but I would have thought this wouldn't have been much interest to me.... but hell Bill, I'm totally into this! LOL
It's really interesting to follow along, and I understand probably 98% of what you're saying too. Which is GOOD, as I'm such a mentalpausal chick!
I can see where sanding down the one piece to gradient into the same thickness of the other will be a very precise job. How will you measure that, by feel?
At 22/9/06 1:11 AM, Bill said…
Pretty much, the sanding operation is by feel. Sand a little, check often. And what doesn't come out exactly will be made up in the finishing process when I add filler and sand it down flush. But I like to get things as close as possible from the beginning, for both the art and skill of doing so, and so it will be stronger. I am concerned about one design issue that I will probably mention in an up-coming update, but all will come out in the wash when the day comes to actually fly it.
Post a Comment
<< Home