Hitting a Wall
I lie awake at night, tormenting myself with thoughts about how to design this airplane I am building, even though it is already partially built. I hate the design for the power connections to the tail (where they are located), and I am really not liking the four-bolt attachment idea anymore. I thought of an idea that would greatly simplify the mounting of the tail to the tail boom, and solve the connector problem, but it means a radical change to the horizontal stabilizer, and I haven't been able to figure out exactly how to do it, and I don't know if it will equate to more weight, or less weight, than the four-bolt approach. So now I'm kind of stuck. Which is kind of OK, since I haven't had a chance to even work on the thing over the past few days. The project is becoming not fun. It was supposed to be simple. I'm half tempted to forget the whole night flying aspect which has created all these ridiculous problems in the first place. Or, I might just go with the external lighting option, even though I've got lights already installed inside. Or maybe I'll just build a new NORMAL tail. Somebody shoot me. Shoot me now. Bang, bang! I think I need to go back to doing some prototyping. If I write a book, it will be about how NOT to do things. Ah, well, at least the car alarm isn't going off.
Car Alarms - Useless Fad Gadgets
I wish I had invented car alarms, right along with leaf blowers and those icicle Christmas lights you see all over the place every year. Every idiot owns one (as well as a few smart people, too, I'm sure). But there's a lot of idiots out there. Take the car alarm, for example. Many people who have car alarms installed in their prescious vehicles still haven't quite figured out that if their car is parked somewhere where they can't possibly hear it, it doesn't do any good. How many times have you come running in response to a car alarm to make sure somebody isn't really breaking into somebody else's car? The thing is, if it's yours, nobody else cares. Who looks? Mostly, people respond to the obnoxious noise factory by an overwhelming desire for the dumb thing to just shut the hell up. I figure people who set their car alarms in parking lots while at the mall or watching a movie at the theater, just haven't figured it out, yet. I sometimes wonder if they even know that their car alarm has ever gone off - if they've ever heard it. We bought a car recently and didn't even know it had a car alarm, until one day when it went off and I happened to be somewhere where I could hear it. I wondered why nobody was coming out of their apartment to shut the stupid thing off, so I went out to see what car it was. I was floored to discover that it was mine, and then I had to figure out how to shut the stupid thing off! We haven't used it, since. Today took the cake, however, as I stopped into Long's on the way home from work, and as I pulled into the parking lot, I could hear someone's horn repeatedly blasting at regular intervals - the characteristic car alarm scenario, but without the myriad of whirs, chirps and whoops. I got out of my car and walked toward the entrance of the store, all the while the car's horn incessantly repeated its call for help. When I got to the door, I came to discover the car was parked, literally, right in front of the door, such that the horn was blasting into the store. Yet, no one was coming to the rescue. I meandered through the store for a bit, looking for some shampoo (as a guy, this is a rather baffling shopping experience), and there wasn't a corner in the store where the alarm could not be heard. I even overheard two Long's employees talking about it, one asking if it was a store alarm, the other reporting that it was a car alarm. Meanwhile, other shoppers were simply going about their shopping, minding their own business, thinking about things like, "what shampoo should I get?" Still, no one came running. Finally, it fell quiet. The alarm was shut down and peace was restored after several minutes of miserable suffering. The one fact I failed to mention up to this point was that the car in question - the one parked at the front door with the car alarm blasting - had two very young occupants (toddlers?) sitting in the back seat. Yes, they were alive, and looking rather perplexed and sitting very still (as if, perhaps, this had happened before?). Now, it's one thing to park your car somewhere where you can't possibly hear your car alarm. If it goes off and you can't hear it, no problem - out of sight, out of mind. Though I have to wonder why they have a car alarm in the first place, and I can't help but wonder if they think maybe they have something of VALUE in the car that they might be concerned about. I think if someone DOES actually hear their car alarm, they might actually respond to it. So, I really have to wonder why, first of all, someone would set their car alarm when there are live occupants STILL INSIDE? Maybe they don't quite understand how car alarms work. Or, maybe the kids were looking a bit petrified because their parent(s) threatened to discipline them if they moved so much to set off the car alarm. (Hmmm...) Because, what I REALLY don't understand is, if your car is BLATANTLY where not only you, but everybody ELSE can hear it, and you have two kids in the car and the alarm is going off - WHY DON'T YOU COME RUNNING LIKE HELL TO SEE WHAT'S GOING ON?! It's bad enough there are two small children left alone in a vehicle. Although, perhaps that was the owner's plan all along - leave the kids in the car with the car alarm blasting and they'll be fine, because nobody is going to want to go near the thing. Ah, well, such is life. Life in the age of technology. Where leaf blowers are your weekend alarm clocks, and unattended (usually) cars sing to each other in distant parking lots. Oh, and let's not forget keyless entry systems that don't work when the battery is dead. What's next? Self-tying shoe laces? Come on, somebody think of something stupid that everybody would want so I can invent it!
Questor Respite
It has been a busy, busy weekend for the Questor Project. Check it out. I'll be taking a little break from the project again this week, as I have a ton of homework and other personal issues to catch up on. Not to mention, I need to make an entry into the Computer Circus blog, as I have been the long-distance computer fix-it guy today. When it rains, it pours.
Project Updates
I have been busy today on the Questor project. I didn't think I would get to spend much (if any) time on it today, but as it turned out, I spent most of the day on it. And I made tremendous progress! Look for the development link on the project page. I have also added a specifications page, which lists some of the design requirements for the aircraft. Right now, it is a disorganized list, though eventually I hope to group things more logically so that I can keep myself on track. My wife is going on a business trip, beginning tomorrow afternoon, so I will have some free time in the evenings next week (YOU MEAN I CAN TURN THE STUPID TELEVISION OFF?! WOO HOO!!). A while back, I sold a few of my model airplane engines that I wasn't using. Two of them I regretted selling, because they were engines that I had a lot of history with, and one of them flew for many, many hours on my first airplane that I ever built (and still have). That original airplane turned 24 years old, recently, and I have the itch to fly it again, but it has an engine on it that has been converted to diesel and that I am not very familiar with...and I just want my old airplane back, just the way it was. The interesting part of this story is that I kept in touch with the guy I sold these two engines to (the one engine in particular). He is a collector and has nearly 500 engines. GEEZ!! I had not run my engines in years, and thought they were kind of worn out, but this guy took them and cleaned them up and said they ran great and that my original one had a lot of power. That's when I began to feel regret that I had let them go. Both of those engines had a lot of sentimental value (I'm like that about things, especially things that last a long time). So, I decided to ask the guy if he would be willing to sell them back to me. He was! The engines arrived two days ago and are back in my sentimental little hands. The weather is supposed to be nice all week this week (in the 80s! WOO HOO!) and into next weekend (though you know how forecasts go - that could change tonight), so I'm thinking maybe I'll just slap that engine back on that old plane and go find a place to fly it next weekend. What do you think? Should I do it?
Questor Project Relocation
I have created a new section in my project notebook specifically for the Questor project. Questor information and progress has been officially moved there. I will post updates here as they develop, but I am returning my blog to my normal blog status and not relegating it to only project updates. You can find the Questor Project by clicking on the link that now appears under my list of links in the right hand column. Enjoy!
Would it Kill Ya?
Would it kill you to use your TURN SIGNALS? No? WELL IT MIGHT IF YOU DON'T!!! Oh, and by the way -- you can get off my butt OR EAT WHAT COMES OUT OF IT!!! End Vent
Questor, Questor, Questor!
My blog entry titles are getting rather boring - they're all about Questor these days. I really need to move this to a project page. But then I don't seem to have anything else to blog about. I made some more progress yesterday, though it was painfully slow. It seems the more progress I make, the further I am from completion, but that's only because the deeper I get into it, the more issues and details I uncover. I have identified 31 additional steps remaining just to complete the process of laminating the top half of the horizontal stabilizer to the bottom half. However, here's what I got done yesterday... I got to thinking about how I haven't yet decided how to physically connect the power from the tail boom to the horizontal stabilizer, and I thought I better give myself a couple of options. I already had access to the power traces under the mounting plate, but that would be difficult to get to unless I made something that was recessed into the tail where the stabilizer mounts. So, I decided to add a couple more power traces off to the side where they would be unobstructed in case I wanted to connect them through an easier access point.  You can see the new traces (copper foil) on the left. You can also see a couple new clearance holes that I cut for the heads of the mounting bolts to sit down into. You'll see how that works later (though you got a hint of it a couple days ago).  Here you can see the completed upper half of the horizontal stabilizer. Bear in mind that this thing is only 3/32" thick! It now has six functional LEDs installed (three of them were not working yesterday - I had somehow cut one of the wires near a solder connection, probably while I was grinding off high spots, but I fixed that problem). With all the LEDs, wire, solder, copper, mounting bolts, etc. that will be part of this tail, I am hoping weight is not going to become an issue. I am thinking of cutting a hole or two in the fin (vertical stabilizer) to reduce some weight, as well as drill some holes in non-critical areas in the tail boom. Although, there are very few options for where I can do that, so it may not be significant. I may just wind up shortening the tail boom a little bit to decrease the moment arm, though that will make the plane a bit more responsive to the elevator, and I'm not sure I want that. 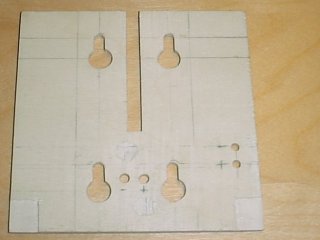 Here's a close-up of the mounting plate that will become part of the lower half of the horizontal stabilizer that gets laminated to the upper half. This is made of light plywood and is 1/8" thick (1/32" thicker than the upper half). It needed to be thicker than 3/32" to provide enough strength for securing the horizontal stabilizer to the tail boom. You can see the four keyhole mounting holes of the kind I featured in an earlier blog entry. This is where the mounting bolts will do their job. You're looking at the side that gets laminated to the upper half. You can see a couple of square-ish clearance cut-outs in the bottom corners. This is to give room for the elevator hinge. I decided to cut them prior to laminating the layers together so I would have an easier time of installing the hinges afterward, and could also ensure a precision fit. You can also see two additional holes that I drilled off to the side to provide access to the new copper traces. 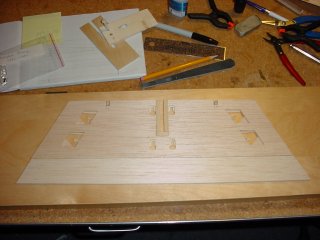 Here is a shot of all the pieces (thus far) of the horizontal stabilizer temporarily assembled, including the elevator. The remaining two pieces of the lower layer are made of balsa wood and are 3/32" thick, which makes the whole stabilizer 3/16" thick after assembly (except for the center, which becomes 7/32" thick due to the 1/8" plywood). One of the steps I have to take before laminating the pieces together is to sand the sides of the center plate down at a gradual angle until the sides become 3/32" and sit flush where they butt up against the 3/32" balsa sides. I know that is as difficult to visualize as it is to describe. It's hard enough to see the assembly in this picture, especially while it is resting on a big piece of wood that is about the same color. 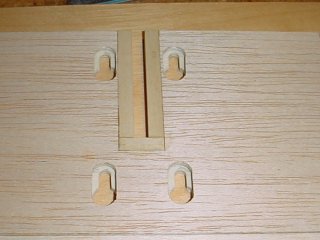 And here's the mounting holes as seen from the top side of the horizontal stabilizer. When completed, the stabilizer will be covered with MonoKote, which is a heat shrink plastic covering that adheres to the surface. The mounting bolts will actually be permanently attached to a mating mounting plate on the tail boom, and the stabilizer will [theoretically] slip down over the four bolts and slide back to lock into place. The holes you see here will be covered by the MonoKote, so the heads of the bolts will not even be visible. It will be a nice, clean installation with no interruption of airflow over the stabilizer! My motto is, I've got a long way to go. But I can see this plane in my mind, and I see it flying, so I know it will happen. I know when I can see the end objective so clearly in my mind, that it is something that will be realized, and I hope to fly this thing at least a dozen times before this time next year. HA! Well, THAT remains to be seen.
Tale of Questor's Tail
Gather 'round kids and let me tell you the tale of Questor's tail. Today's progress, anyway. I have a problem I have not yet worked out a final solution for, and that is connecting the lights in the horizontal stabilizer to the power rails in the tail boom. However, I proceeded ahead with my original plan and will probably just implement a connector I will have to plug in, manually, unless and until I have another aha moment. I called up a friend of mine to bounce some ideas off of. Actually, he called me, but I sent him a message in ICQ first. :) After we tossed some ideas around for a while, tossing most of them out, we finally came to a solution that my friend said that I had suggested to him at some point in the past (and it would have probably saved me a lot of time had I remembered this particular suggestion). He said, why not mount the LEDs on the fuselage, externally (in my case, on the tail boom) and simply aim them at the tail? In other words, instead of going through jars of Excedrin PM to get the thing to light up from the inside, I could simply light it up from the outside. Brilliant! (no pun intended...ok, yes it was) Well, that would be the easy solution. Really, it would. But, being the complicated person that I am, I decided to press on with the current design. After all, I had already cut out all the frickin' pieces!!! Progress was extremely slow going in the beginning. I made a couple of false starts, which cost me an hour here and there. I neglected to mark all the places where holes needed to be drilled, hinges needed to be inserted, etc., but at least I didn't do anything irreversible and was able to drop back and restart without killing anybody. I can't even remember what all transpired to make things go so slowly. I guess there was just a lot of testing of ideas going on. One test failed, at least temporarily, then I thought of a tool that I could make to fix the problem that made the test fail, so I was happy about that. It involved a method of preventing the thin sticky-back copper strips from coming off when I soldered the LED wires to them. I figured that out pretty quickly and was able to move on. I used an old dried up ball point pen to make traces (tiny canals) in the balsa wood for the LED wires to run along so that when the layers are laminated together, they would press flush together. At some point, the pen started working again, so that was kind of annoying. Luckily, I had another old dried up ball point pen that I used to finish the job. It makes perfect little trenches in the wood for the tiny wires to sit down inside. Most of the time spent on this stupid (can I say stupid?) project is in thinking about this thing in three dimensions and trying to figure out where everything goes without getting in the way of something else. It turns out, I have very little wiggle room in this tail and it has been far more complicated than I ever anticipated. I only wish I had thought or (rather, REMEMBERED) the external lighting solution in the beginning, since then I could have built this tail in a weekend. Who would have thought that running a couple wires to the tail and installing six LEDs would be such a pain in the tail section? I guess I should have. Anyway, how about some pictures! I know they're kind of small, but I'm low on disk space, so can't host larger ones at the moment.  Here's the upper laminate of the horizontal stabilizer with all the LEDs installed. The blue wires are all run along the little canals I dug with the ball point pen, and you can see the two peel-and-stick copper strips at the top (which is really the rear of the part). 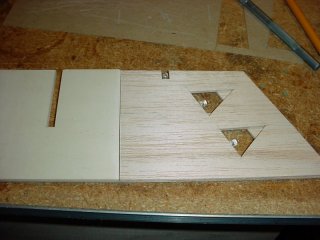 Here I have placed a couple of the lower laminate pieces over the assembly (the bottom is facing the camera) to show kind of how the final product will look. The tail will be covered with MonoKote, so the light from the LEDs will show through the covering. I cut out triangles on the lower laminate, and parallelgrams on the upper laminate (which is underneath in this picture, since the part is turned over). That way, I can tell the difference between the top and the bottom of the aircraft if I happen to lose orientation in the night. One LED faces straight forward, which is always helpful from many angles, especially during night landings (the plane is hardest to see at night when it is coming straight at you). 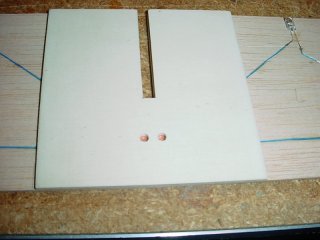 And here is the implementation of the idea I had the other day (yesterday?). I have drilled two holes in the mounting plate for access to the copper strips so I can wire the thing up once I get it all together. OH MY GOSH! How could I have forgotten this? I just remembered what took so much time this morning - why things got off to such a slow start (besides going down to Cingular to get my SIM card upgraded and to drop off my late rent check). I had to select the LEDs to use on the plane! I wanted to use LEDs that were closely matched throughout the plane, and I needed 27 LEDs for the entire project. I set up a test station to plug in the LEDs and measure their forward voltage drop. I tested probably 400 LEDs, and piled them in separate piles, depending on the voltage readings. Once that was all done, I took the biggest pile and re-tested them, breaking them into smaller piles, depending on voltage readings (a finer breakdown). Once that was done, I picked 27 LEDs that were about as closely matched as I could get (considering my setup). After I had my LEDs chosen, I put all the piles of LEDs into separate little ziplock baggies and labelled them, so I won't have to go through this lengthy process again in the future. Man, that took a long time, but I think it was worth it. Six of the LEDs are now mounted in the tail! Woo hoo! Only 21 more to go! Sigh. 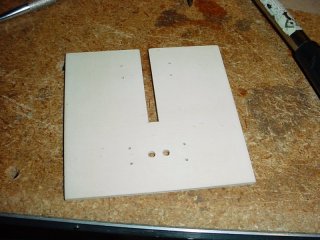 I still have a long, long way to go on the tail, and an even longer route ahead of me when I finally ever get to build the wing. Right now, I am working on the mounting plate (above), which is the center part of the lower laminate of the horizontal stabilizer - it is the piece that will hold the stabilizer to the tail boom, once that is built. I've got some tricky hole drilling and cutting to do, and I haven't quite worked out the tooling sequence I need to make this work out right, yet. It's a jigsaw puzzle. I find myself making tools half the time just to make the pieces I need. I guess that's part of the art of woodworking. I am learning a lot, that's for sure. I picked up a couple of excellent books on this stuff and am reading all about paint and finishing now, so when I get to that point, I'll be armed with some new knowledge. I went to a class the other day on how to improve your memory, and I am practicing the techniques and it seems to be working. I am confident that now I won't forget this stuff when it comes time to use it. I'm even thinking of using this one book as the first book that I memorize. Yes, it is possible to memorize an entire book - even word for word if you want to go to that level - but that's a subject for another blog...or a book or something. By the way, I learned 14 words in Spanish during this three-hour memory class - and that was just one exercise. I still remember the words (though I can't spell them), as well as the names of the 21 other people in the class. Cool beans, Maynard! Anyway, back to work. Er, uh, well maybe it's back to bed. Rats! Weekends are TOO SHORT!!! Oh, man, I just realized I'm hungry. Did I eat today??? Please send food! UPDATE: Here's a few more pictures for you: 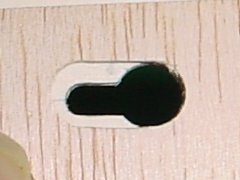 The horizontal stabilizer will be secured to the tail boom via four 10-32 nylon bolts. This is a sample of what the lock-down slots will look like - kind of like what you might find on the back of an average power strip. 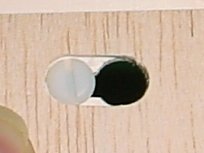 Here's what it will look like when it is secured to the mount with a nylon bolt.  I have gone ahead and cut the clearance holes in the upper laminate for the horizontal stabilizer. The mounting plate seen earlier will get the tricky holes cut into them, like the kind you see on the back of an average household power strip (or wall-mounted telephone). I have no idea what the name is for that kind of hole. Now I'm going to bed. It's almost 3:00 a.m.
Questor Continues
Well, the weekend is here, but my wife isn't, so I've got the place to myself for a couple of days. I may as well work on my airplane. I was working on figuring out how to get the power lines connected to the tail section for the lights in the horizontal stabilizer, and I think I came up with an awesome solution. I originally was just going to have wires running between the laminations and exiting out through some exit point, but I figured there is a possibility that over time, or in the event of a mishap, the wires could break at the exit point, making it impossible to reconnect them. So, I thought of running some kind of wide metal conductor between the laminate and simply drilling a hole down to expose the conductor so that I could solder a wire directly to it. That way, if the wire ever broke off or became severed, all I would need to do is solder in a new wire. The solution was this stuff: 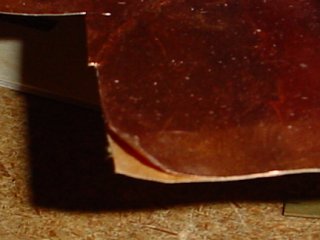 This is a sheet of very thin peel and stick copper sheeting, presumably used primarily in stained glass work. All I need to do is cut a strip to the size I need, stick it down between the laminated pieces, and I'm done. I constructed a test piece to determine if the idea would work, and it worked beautifully!. 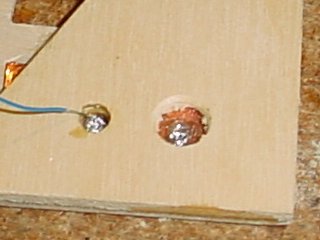 I drilled two holes, because I didn't know if I was going to be able to effectively solder within the smaller hole. But it turns out it wasn't a problem at all. This was just the answer I was looking for. This fixes the big question mark for the horizontal stabilizer, so now I just need to work out something similar for the tail boom. There will be a connector coming from the boom to mate with a connector in the stabilizer once it's all done. I hope to complete a good portion of the tail this weekend. I think I'll start by getting some sleep!
Questor Tail Trial Fitting
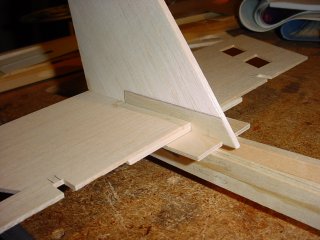 I've got most of the tail pieces cut out, and you can see many of them fitted together in the image. I am very pleased with how it is coming along! Nothing is glued together in the picture - they're just assembled to see how they fit. I am amazed how close the tolerances are in the pieces I have made. It may be a while before I can get back to working on this project, however, as I have a busy week ahead and may be out of town next weekend. I just hope I can get the tail DONE by Halloween so I can start on the fuselage. I hope to have the fuselage done by Christmas so I can start on the wing. The wing will take the longest, but I hope to finish it by April so I can install the engine and radio, etc. and be flying by June '07. That's if we don't move between now and then. UGH!!! Wish me luck.
Questor, Day 6 - Templates
I cut out some of the remaining templates for the tail section. This thing keeps undergoing design changes, so it's hard to keep up. There are so many things to consider, it is difficult to keep it all straight. But I think I figured it out, now. I found a use for the bad boom sticks - they will be cut and used in the fuselage section. So, not all is lost. That's good news. I picked up some more wood to make the new tail boom, and got some glue, and some various other things, including a coping saw. I also picked up this awesome book that has a bunch of building techniques, etc., including how to make tools and jigs for certain tasks. I quickly dug into my stash and put together a bevel sanding jig, which I am sure I will make good use of. Eventually. It was one of the projects in the book. I guess I needed a little side project to distract me from the main one for a bit. I also added some PVC pipe to the structure that is currently holding my airplanes so that I could stack this pile of wood I have collected thus far for the Questor project. It was cluttering up my workbench and getting in my way. Now it is up hanging over my head, no doubt ready to drop down on me at any moment. As I mentioned, I cut out some more templates.  I still have a long way to go, but if you would have asked me what I was making today, I would have said, "progress." That's always a good sign. I'm going to see how much more I can do before the night is over, though I don't know when I'll actually get to building the new boom, since there are still a couple of details to work out. By the way, I just got back from seeing the movie An Inconvenient Truth. If you haven't seen it yet, GO SEE IT!!! It's an absolute must, especially for the skeptic naysayers who don't believe in global warming.
Questor Project, Day 5
After further analysis of my blunder the other day, I realized it was a blunder on both ends. The design was incomplete for where the boom attaches to the fuselage, and as fortune would have it, there is a problem on that end of the sticks, too. So, the bottom line is, I am starting over. But that's what happens in prototypes sometimes. I don't know if the hobby shop has any more of the size sticks I need, but I will be taking a trip down there on Saturday to find out. If not, it may be a while before I can rebuild the sticks. A trial attempt to test to see if I could separate the existing sticks at the lamination point, failed, and it just makes more sense to build new ones, anyway. I need to route the wires differently on both ends, and this time I am going to run both leads down only one side (one of the booms) so I don't have to go through the entire process of building two mirror-image booms. It's a long process to make just one. I also have a different (better) connector idea in mind, so will be pursuing that as well. The new design will have the connector on the fuselage end coming out of the very end, instead of protruding from the side as was seen in earlier images. Also, because I don't need the wire in the bad boom sticks anymore, I might be able to use one of the bad sticks for the side that won't have the (real) conductors in it. That way, I don't have to build TWO more boom sticks. Tonight, I did a little work on the fin. I drew up and cut out templates for the pieces that make up the fin. The fin is 3/16" balsa wood with 1/32" plywood sheeting along the bottom to stiffen the descending tab and give it additional strength and durability. Eventually, it will have a slot and a hole in it that will be used to secure it to the tail, but that won't happen until I get the new boom sticks together. I used the templates I made to trace and cut out the actual parts I need for the fin, as seen here. 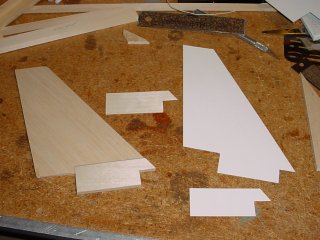 The pieces are ready to be laminated together, but I don't have the right glue that I want to use for the procedure. I'll have to get that at the hobby shop tomorrow. I have done a little preliminary light sanding in a couple of areas that will be impossible to sand properly once the pieces are laminated together. But once they are assembled, I can do some more sanding to get the fin to the proper shape. Then there will be a lot of little fine-tuning sanding to get the fin to fit exactly in place when I get the rest of the tail under way. I will need to build the stabilizer (which consists of many pieces) before I get to the precision fitting process of the fin, but I need the fin built, first, before I can build the stabilizer. There are so many dependencies in this thing to get everything to fit just right and be strong and solid, and I need to do it right, because I can't afford to start over again. Keep your eye on the sky! Update: I made a jig and am using the bad sticks to mock up a frame for sizing up the remaining tail pieces. I have cut out some templates for the tail gusset and the stabilizer mounting plate and for part of the stabilizer. 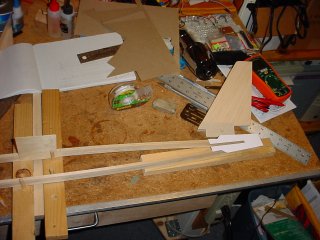 I hope to complete the templates for the stabilizer and possibly even cut out the pieces tomorrow. I had to re-design the stabilizer (what else is new?) after realizing something I overlooked. It is so much easier to work with real pieces! I don't know why I stopped cutting cardboard and started drawing - I just can't see things in 3-D when I'm drawing. What gets me is my original cardboard version looks just like my "new" re-design. Sometimes, I just never learn. It also doesn't help that I have distractions and interference from family, a job, and school. BLECCH!
Questor Takes a Left Turn
I think I just encountered my first frak-up of this project. Can I say that in my blog? I made two beautiful boom sticks, complete with power lines, and I was contemplating a mechanism for securing the locking pin in place once I get to the point where I can insert the fin and lock it down. Then I realized that in order to insert a locking pin, I need to drill a hole. And just where do you think I need to drill a hole? Right through the center of each of the boom sticks! Well, what is at the center of each of the boom sticks? A FRAKING WIRE! Can I say that in my blog? 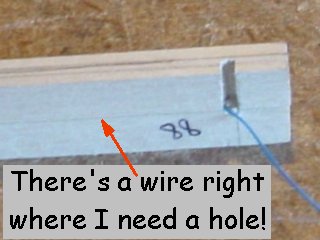 So, now I have to spin a few hundred cycles (wash, rinse, repeat) to figure out how to work around the problem, or to determine if it is easier to just start over. It is possible I still have time to salvage the operation. The epoxy that I used to laminate the sticks together is still young, and even old epoxy will loosen up enough for parts to separate if enough heat is applied. And I've got a nice little heat gun I could shoot at the thing. But once separated, things get messy, because then I have to use a #18 X-acto chisel blade to scrape off the epoxy residue while blasting it at the same time with the heat gun. Then I would have to perform the lamination process all over again after re-routing the wire around the area where I need holes drilled. Another alternative is to cut a portion of one of the laminated sticks and separate only that segment to perform the operation, but then that can introduce weakness into the structure and will require that I cut two new pieces to fit back into place. Not very elegant. One remaining alternative is to work around the wires and drill the holes slightly higher than I need them to be. But then the wire is still in there, and I have no additional room to work, and I will be unable to install a piece I have been designing that will secure the locking pin in place for flight. So, I would have to re-design that, after now having settled on a design idea after rattling my brain for several days on the problem. Frak. I'm pretty sure I can say that in my blog. So, just like most of my life, one step forward and one step back. Nothing ever changes.
Questor Construction Begins
Welcome to Project Questor. That is the working title I have given to my new airplane project. Some new information obtained yesterday may steer my project in slightly new directions (as far as design). I had a good day of flying, yesterday, by the way. I got out late and went to Rancho San Antonio park and found some guys flying electric helicopters. I discovered the park does not allow gas powered planes (WHAT?!?!), so I could not fly there, but the guys there told me about Bayside RC club in Fremont, so I went out there. There is simply no convenient place to fly on the peninsula! It sucks. Anyway, I got to the club and realized I had flown there once before. Once. The pilot stations face West, which makes the place useless for flying in the late afternoon (who wants to go blind?). And it had a very restricted flying range and an extremely narrow runway. Neither of which was a problem for my flying skill, just an annoyance. The real annoyance were the hot shit hot shot hot dog testosterone driven pilots out there flying helicopters like they were angry insects, and airplanes like they were helicopters. I was tempted to go ask the helicopter pilot what was wrong with his helicopter and why it wouldn't fly straight (being totally sarchastic, of course), but then he crashed it and I felt the need pass. My little blue Stick 30 with the diesel 4-stroke O.S. .26 (converted) engine could hardly be heard - man I love the quiet! - and towed my little plane around the sky with ease. I did touch-and-goes in a cross wind and was having a good time. I brought three planes out with me, but only flew the one. The one that turned 24 years old this weekend did not fly, but I am determined to fly it again, soon. 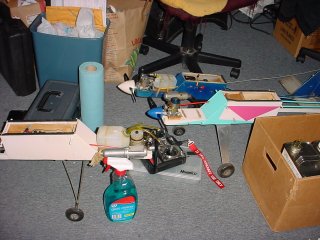 Those are the three planes (partial shot, anyway) just before I packed them into the car. My next door neighbor happened to come home and see the planes in the car. It turns out he used to fly a lot - mostly off the water. He used to fly a Stick 30 - just like the blue one in the picture that I flew yesterday - with pontoons! I am going to take advantage of his knowledge and have him help me make pontoons for my new plane. He also mentioned that he crashed his plane and put the wing from another airplane on it and it flew like a dream. I am going to see if I can track down the airfoil and the dimensions for that wing and work it into my new design. I am still designing - and will probably continue to revise my designs as I build - but construction began today. I am starting with the tail section. At first, I thought the fin was what I needed to build, first, so I could build the supporting pieces to fit nicely. But then I realized I needed to figure out the electrical connections to support night flying (lights in the tail), and that necessitated building the tail boom, first. So that's what I did. This first image, below, shows a closeup of one of the boom sticks being built. I have installed a connector with a single wire that extends all the way down the stick to where the stabilizer will mount. This wire sits between two sticks that are laminated together to become one of the boom sticks. 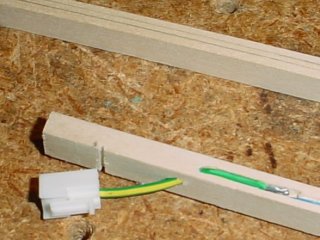 The shot below shows the two sticks laminated together to become the right-hand side tail boom stick, with the electrical connector extending from within. Sealing the wire between the sticks in this manner will completely eliminate any possibility of wire chafing or vibrational breakage over time. 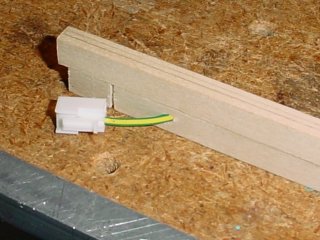 The positive lead runs down one boom stick, and the negative lead runs down the other stick. Here is a shot of the wire exiting the other end of one of the sticks. Eventually, there will be a connector permanently installed where you see the notch, and the stabilizer will plug into it when it is mounted on the tail boom. 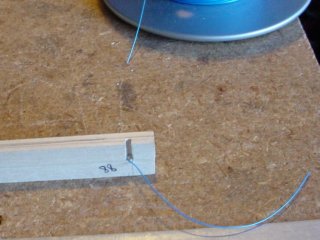 And here, below, you can kind of see the two completed boom sticks laying together on the bench. Next weekend, I will be doing some serious work on the tail section. I will have to make a jig to get the proper bow in the boom sticks, but that should be pretty easy. Then I can glue the gusset on the tail end and begin building up all the pieces.  There are 17 (potentially 19) additional pieces I need to make for the tail, not including wire for the LEDs in the stabilizer, the LEDs, hinges, tail skid and five nylon bolts. Because of the removable nature of the tail, it is the most complex piece of this airframe. Once it is done, the rest will go rather quickly...except the wing, which, of course, will take considerable time. Then comes the tedious job of sanding, filling, sanding, filling, sanding, painting and covering the thing. Then I'll get to install the landing gear and flight controls, radio and engine, do all the pre-flight testing, then take it out for a test flight. Then I'll be in business! I should have it ready to fly by next summer...and I plan to do a lot of flying next summer!
Born to Fly
I am going out in the morning to fly a couple of my model airplanes. It has been a LONG, LONG time! I'll let you know how it goes.
|
|

